PLAYHACK November - Adding Tank Controls


As this is our first PLAYHACK we thought it would be sensible to start with a few tips and tutorials to get you going. We'll follow up with more of these throughout the week. Don't forget, these are just examples. You can make any game you like.
Tank Controls
Our first snippet of code is going to get you controlling your tank. This will give you an little introduction into the PlayCanvas physics system as well as reading keyboard input.

Setting up the Physics
The pack you started with has a tank entity set up. To add physics we need to add a rigidbody and a collision component. It's not quite that simple though, as we need to make sure that geometry lines up in the center of the collision body.
Here is one way to set up the hierarchy:
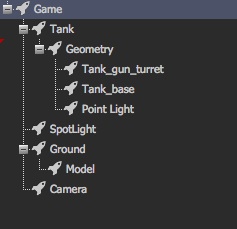
The Tank entity is setup with rigidbody and collision components. The Geometry entity is a container for the models and the light. We can position the Geometry entity so that it lines up in the center of our collision.
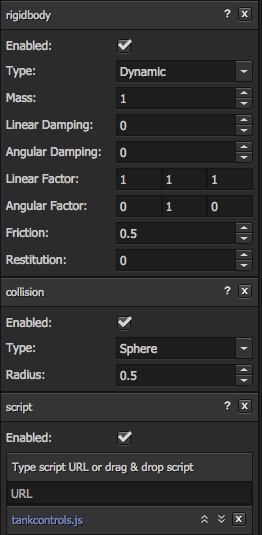
Here is the attribute panel for the Tank entity. You can see we've set the collision shape to be a sphere, the rigidbody is dynamic and we've set angular factor to [0, 1, 0] which means the sphere can only rotate around the y-axis.
We've also added a ground collision box so the tank doesn't fall through the floor. After that, the only thing left to do is read the keyboard input.
Keyboard input
pc.script.create('tankcontrols', function (context) {
    // Creates a new Tankcontrols instance
    var Tankcontrols = function (entity) {
        this.entity = entity;
        this.force = new pc.Vec3();
    };

    Tankcontrols.prototype = {
        // Called once after all resources are loaded
        initialize: function () {
        },

        // Called every frame, dt is time in seconds since last update
        update: function (dt) {
            if (context.keyboard.isPressed(pc.input.KEY_LEFT)) {
                this.entity.rigidbody.applyTorque(0, 1, 0);
            }
            if (context.keyboard.isPressed(pc.input.KEY_RIGHT)) {
                this.entity.rigidbody.applyTorque(0, -1, 0);
            }
            if (context.keyboard.isPressed(pc.input.KEY_UP)) {
                this.force.copy(this.entity.forward).scale(10);
                this.entity.rigidbody.applyForce(this.force);
            }
            if (context.keyboard.isPressed(pc.input.KEY_DOWN)) {
                this.force.copy(this.entity.forward).scale(-10);
                this.entity.rigidbody.applyForce(this.force);
            }

        }
    };

    return Tankcontrols;
});
This script is attached to the Tank entity. It's pretty self-explanatory. Each frame, update() is called. This function checks to see if the any of the arrow keys on the keyboard have been pressed. If they have a force or torque is applied to the rigidbody attached to the entity.
Here is the Pack with this already set up for you to try. Run the pack and use the arrow keys to control the tank.
PLAYHACK
PLAYHACK is our monthly game jam. We'll give you a starting point and you have a month to build a game. The winner is featured on our frontpage and wins fame and glory everlasting!
Not started work on your PLAYHACK game yet? What are you waiting for go fork this project!
