PLAYHACK November - Camera types

As this is our first PLAYHACK we thought it would be sensible to start with a few tips and tutorials to get you going. We’ll follow up with more of these throughout the week. Don’t forget, these are just examples. You can make any game you like.
Camera Types
This blog post is going to cover a few different types of camera. We're also going to cover Script Attributes, which lets you expose values into the Designer.
Try running the Follow Camera Pack in this Project to see all this code in action. Use the arrow keys to move the tank and press the Spacebar to cycle between the different camera types.
Fixed Follow Camera
The fixed follow camera is a type of third-person camera which follows the target at exactly the same distance and angle at all times. This type of camera is very easy to implement. In fact you could set it up just by setting the Camera entity as a child of the tank. We're going to show you how to do it in code though.
updateFixedFollow: function (dt) {
    this.entity.setPosition(this.target.getPosition());
    this.entity.setRotation(this.target.getRotation());
    this.entity.rotateLocal(this.elevation, 0, 0);
    this.entity.translateLocal(0, 0, this.distance);
},
This function sets the camera to be at the same position and rotation as the target (the target in our code is the player's tank). Then we rotate by the this.elevation value and move the camera backwards (backwards is along positive z axis) by the this.distance value.
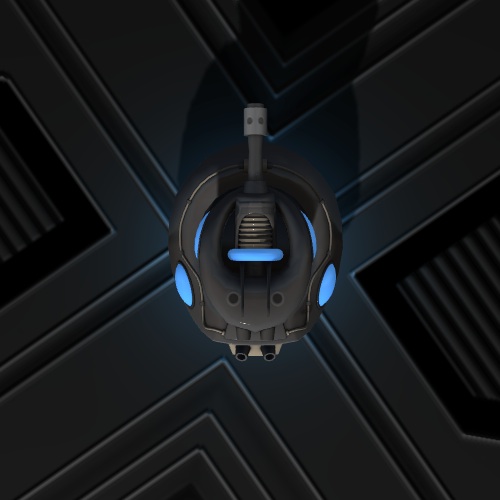
Try at home: Try modifying the elevation and distance to setup up and overhead camera like the one in the picture.
Trailing Follow Camera
The trailing follow camera is a slightly more advanced form of third-person camera which follows the target, but it is always trying to catch up to where the fixed follow camera would be. This gives a smoother motion, but can lead to the camera loosing the player if it trails too much.
updateTrailingFollow: function (dt) {
    var pos = new pc.Vec3();
    var rot = new pc.Quat();

    // store initial position and rotation
    pos.copy(this.entity.getPosition());
    rot.copy(this.entity.getRotation());

    // set entity to be at target position and rotation
    this.entity.setPosition(this.target.getPosition());
    this.entity.setRotation(this.target.getRotation());
    this.entity.rotateLocal(this.elevation, 0, 0);
    this.entity.translateLocal(0, 0, this.distance);

    // interpolate start pos/rot to target pos/rot
    pos.lerp(pos, this.entity.getPosition(), this.positionFactor);
    rot.slerp(rot, this.entity.getRotation(), this.rotationFactor);

    // Set to interpolated position
    this.entity.setPosition(pos);
    this.entity.setRotation(rot);
}
In this function we store the current position and rotation, calculate the position of the fixed follow camera and then use lerp() and slerp() to interpolate the position. lerp and slerp stand for Linear intERPolation and Spherical Linear intERPolation. This is a way of moving between two values by supplying a value between 0 and 1. In this case we use the positionFactor and rotationFactor as the input to the interpolation.
Finally we update the position and rotation to the final values.
This a very simple implementation of a trailing camera. There are all kinds of ways you can implement one. Another method is to use a spring simulation to attach the camera to the target point. Then you can adjust the stiffness of the spring to modify how much the camera trails.
Look At Camera
The final type of camera is a static look at camera. The camera never moves but just aims at the target.
updateLookAt: function (dt) {
    this.entity.lookAt(this.target.getPosition());
},
This code needs no explanation.
Script Attributes
The final tip to share is how to use script attributes to expose values your code needs into the Designer.
pc.script.attribute("elevation", "number", -30);
pc.script.attribute("distance", "number", 5);
pc.script.attribute("positionFactor", "number", 0.2);
pc.script.attribute("rotationFactor", "number", 0.2);
This code at the top of the camera script, tells the designer to expose four values elevation, distance, positionFactor and rotationFactor and show them as editable numbers in the Designer.
Back in the Designer, we need to load the script attributes from the script using the Entity -> Refresh Script Attributes menu item. Then we'll see this attribute block appear on the script component.
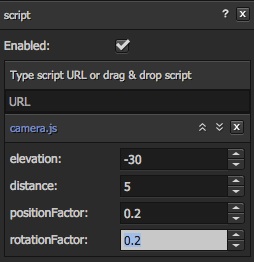
Modifying these values will directly update the script live when it is running from the Designer. So you can tweak values with the live game running in a separate tab. This can really accelerate your development.
That's it for now. Don't forget you can try running the Follow Camera Pack in this Project to see all this code in action. Use the arrow keys to move the tank and press the Spacebar to cycle between the different camera types.
PLAYHACK
PLAYHACK is our monthly game jam. We’ll give you a starting point and you have a month to build a game. The winner is featured on our frontpage and wins fame and glory everlasting!
Not started work on your PLAYHACK game yet? What are you waiting for go fork this project!
