
9 posts tagged with "workflow"

View All Tags

Using Visual Studio Code with PlayCanvas

· 2 min read

Visual Studio Code is massively popular. In the Stack Overflow 2023 Developer Survey, Visual Studio Code was ranked the most popular developer environment tool among 86,544 respondents, with 73.71% reporting that they use it.

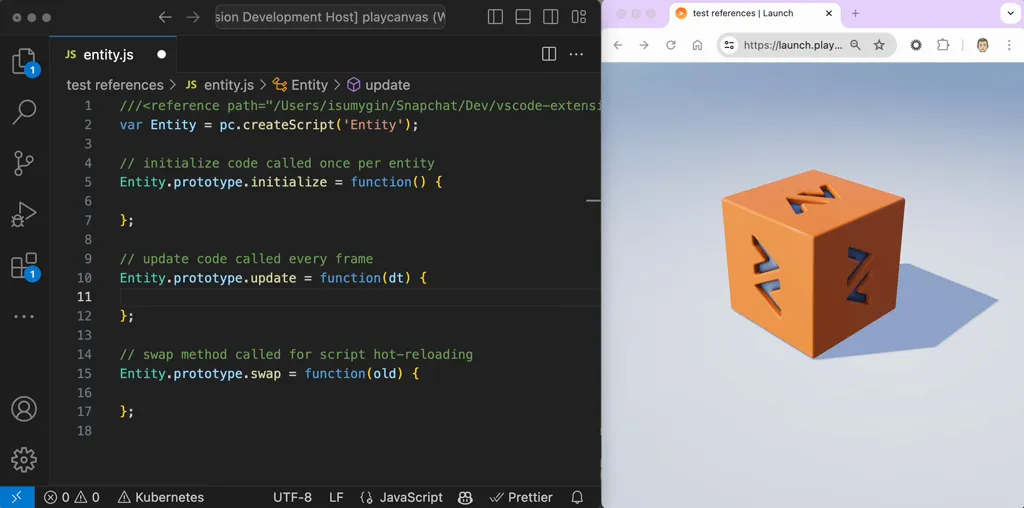
Any PlayCanvas developer building directly on top of the Engine will very likely opt to use VS Code. But if you use the PlayCanvas Editor, you will normally rely on the built-in, browser-based Code Editor. Today, we're excited to give you another option by launching an open-source Visual Studio Code Extension for PlayCanvas.

VS Code Extension

Benefits

The PlayCanvas Code Editor is actually built on the Monaco Editor, the beating heart of VS Code. So why use VS Code instead of the PlayCanvas Code Editor?

  • GitHub Copilot - leverage AI to help you write PlayCanvas code faster.
  • Powerful IntelliSense tools (code completion, parameter info, quick info, and member lists).
  • Leverage a huge library of other extensions to accelerate your development.

We ❤️ Open Source

As you might expect, we have open sourced the VS Code extension under a liberal MIT license!

So if you find a bug or have a suggestion, please do log an issue. And for the more adventurous, consider making a code contribution!

We want you to feel empowered to make these tools your own. Let's make them awesome together! 🙌

Get Started Now

If this all sounds great to you, why not give it a try? Head over to the User Manual for instructions on how to get started:

READ THE DOCS

Boost Your Efficiency: Editor gets Support for AVIF and WebP

· 3 min read
Mark Lundin
Software Engineer

AVIF + WebP Support

Today we're excited to announce that PlayCanvas now supports WebP and AVIF images natively in the editor. Two new, efficient image formats built for the web.

This is not just an exciting update for us but a game-changer for anyone looking to optimize their projects for faster load times and better quality.

JPGs and PNGs have served us well. They're reliable and you can use them everywhere. AVIF and WebP are the new kids on the block. They offer better compression with a wider range of features like alpha channels, HDR and wide color gamut. But how do these formats work in practice and are they really that good? Let's dive in.

Take a look at the following images:

They look strikingly similar, but the file size tells a different story. The AVIF image on the left has a file size of just 18Kb, and the JPG counterpart over 4 times larger at 74Kb! This level of compression is not just impressive on its own. When you're working on a project with multiple textures, switching to AVIF and WebP formats could considerably reduce your overall load time.

What does this mean for you? Well, that's simple: it's all about efficiency and speed without sacrificing quality. Textures are one of the biggest assets in a 3D project and AVIF and WebP significantly reduce image sizes compared to traditional JPEGs and PNGs and that means faster load times and happier users. 🙌

AVIF all the things?

Ok, so browser support for AVIF is good, but not great according to caniuse, so always check support and use the right format for your users. Different formats are better suited for different content. It's not a one-size-fits-all solution, so we encourage you to explore various options and choose the one best for you.

Getting Started

Easy! Just start uploading your AVIF and WebP files into the Asset Panel, and for those of you wanting to convert your existing assets, you can now right-click on your asset in the Asset Panel and quickly convert your asset into a PNG, JPG, WebP or an AVIF.

Quick Convert

So there you have it! This is not just a feature release; it's our way of saying we're listening and we care. We're excited to hear your thoughts on these new features. Give them a try and share your experiences with us.

Till then, keep creating, keep innovating!

PlayCanvas Adds Sketchfab Integration

· 3 min read

Today, we're excited to announce the integration of Sketchfab into the PlayCanvas Editor!

"Spartan Armour" by McCarthy3D is licensed under CC BY 4.0.

With today's launch you'll have instant access to Sketchfab's enormous library of high quality 3D content right inside the Editor.

What Is Sketchfab?

Sketchfab is a platform that allows users to publish, share and discover 3D content on the web. You can think of it as a sort of "YouTube for 3D models". The platform hosts millions of 3D models in various formats, including glTF, OBJ, STL, and more.

Users can upload their 3D models to Sketchfab and embed them in other websites much like one would embed a YouTube video. This has made it popular for showcasing 3D models for a wide range of uses including game assets, 3D scans, architectural models, and educational content.

Accessing Sketchfab from the Asset Store

Earlier this month, we announced the brand new PlayCanvas Asset Store. The Asset Store is an in-Editor panel of useful assets that you can use in your projects. With a few clicks, you can browse, discover and import various types of content. So it is the obvious place to incorporate the vast Sketchfab content library.

To access the Sketchfab library, simply hit the Asset Store button on the Asset Panel header and select the SKETCHFAB filter on the left.

Open Sketchfab

Authorizing PlayCanvas to Access Sketchfab

If you want to import models from Sketchfab into PlayCanvas, you first need to create a Sketchfab account. Then, the first time you try to import a Sketchfab model in the Asset Store, you will be asked to authorize PlayCanvas to access your Sketchfab account.

Authorize Sketchfab

It's so quick and easy!

New License and Author Info for Assets

Sketchfab assets are all tagged with a license and an author. When you import Sketchfab content into your PlayCanvas projects, it's important that we preserve this information. Now, when you click on any imported asset, you'll see we've added links to license and author information in the Inspector panel.

Sketchfab Licenses

This ensures that the author's licensing wishes are respected and that they recieve credit for their work.

Go Forth and Create

With today's release, it's never been easier to create interactive 3D experiences for the web. We hope you love the new Sketchfab integration. But, as always, we love to hear your opinions so head over to the forum and join the conversation. Happy creating! 🚧👷

Announcing the New PlayCanvas Asset Store

· 4 min read

The PlayCanvas Asset Store is the first place that users tend to go to find content for their projects. This is especially true for new users who want to get started as quickly as possible. Up until now, the Store has not been particularly easy to use and the content has not changed in quite a long time. In short, a complete overhaul and refresh has been long overdue. So today, we are incredibly excited to announce a major upgrade for the PlayCanvas Asset Store!

First up, check out a little example of building a city scene using content taken from the Asset Store. A skybox, a pack of 3D city block meshes and a camera control script are imported and the city is built via drag and drop. And not one single line of code is needed!

Now, let's examine some of the key highlights that make the new Asset Store so special.

Built Right In To The Editor

It should be possible to grab assets quickly, right from within the Editor itself. Why should you have to open a new tab and go hunting around the web? So to keep things as convenient as possible, the ASSET STORE button (in the Editor's Assets Panel) now opens a nicely designed, responsive Asset Store panel.

Asset Store Panel

One really cool benefit of selecting assets from within the Editor is that the currently selected Asset folder is known. This means you have compete control over where your imported assets will be saved.

Preview Store Assets Before Import

Sometimes, an asset thumbnail just isn't sufficient to tell if a particular asset is what you want.

Asset Store Viewer

Our new Store allows you to select a Store Item and preview it in an appropriate viewer (glTF Viewer for 3D models, Texture Viewer for textures and cubemaps).

Find What You Want Quickly

As the number of store items continues to grow, it's going to be incredibly important for you to be able to narrow down your assets searches. As a result, the new Store comes with powerful searching, sorting and filtering capabilities.

Asset Store Search

You can filter by asset type, search asset names and descriptions and then order search results on a host of criteria.

Fresh New Content

Recently, the Asset Store content was, let's just say, beginning to show its age. We are now in a world of HDR skyboxes, PBR materials and high polygon meshes. So it made sense to erase old store items and refresh the Store with better, more modern content. We have selected a broad variety of Creative Commons assets from fantastic content sources such as kenney.nl, HDRi Haven, Sketchfab and Khronos' glTF Sample Models.

Asset Store Content

If you would have any suggestions for content you would like to be added to the Store, please do let us know!

The Future

There's still so much we want to do with the new Asset Store! But here are some things we have in mind:

  1. More Content. The important thing to say about today's update is that it delivers the core infrastructure on which we can iterate. It is now exceptionally easy for us to populate the store with more content. So, in the near term, you can expect to see the range of content expand quite rapidly.

  2. Third Party Stores. Now that we have a solid foundation in place for the Store, we have the ability to host third party stores within the same UI and maximize your choice.

  3. More Asset Types. Today's launch offers models, fonts, textures, skyboxes and scripts. Next, we want to add audio assets and template assets (AKA prefabs). Template assets in particular are very exciting because you would be able to import fully interactive, visual entities into your projects (such as a drivable vehicle or a controllable character).

What would you like to see us add to the Asset Store next? Let us know on the forum.

Happy creating, friends!

Anim Layer Masks and Blending

· 4 min read
Elliott Thompson
Software Engineer


RUN DEMO

Today, we are releasing the latest anim component feature: the masking and blending of anim layers.

This is a versatile feature that has been hotly requested by PlayCanvas developers that wish to get even more creative with their animations. We’re excited to be able to share how it works in this blog.

Animating characters

When creating complex animation behavior for games, it is often necessary to make a character carry out multiple actions at once. For instance, you might want to create a character that can pick up and carry an item, or shoot a weapon while freely moving around a scene.

To perform these actions at the same time, the upper and lower body of the character must be animated independently. The upper body should be able to move from an idle stance to a shooting stance, and then shoot on demand, all while the lower body moves between idling, walking, running based on the player's command.

A character with two animation layers. A movement layer and a shooting layer masked to the upper body

This effect can be difficult to achieve in most 3D engines, as it usually requires removing certain animated bones in the animation files themselves, before importing those assets into a game project. Only then would a developer be able to create two animation layers, one for movement and another for shooting.

A shooting animation might have all of its lower body bones removed, which would free up the lower body to be animated by the movement layer. In large projects, this can start to become really cumbersome. Adding or removing bones from an animation would require a rebuild of the animation asset in whichever modelling software the developer is using, followed by a reimport of the asset into the PlayCanvas project.

Anim Layer Masks

Masks can streamline this workflow by enabling developers to add or remove a model’s bones from an animation layer directly. This means you can select which part of a character a particular set of animations should animate directly in the PlayCanvas editor. Testing out different combinations of character bones now becomes as simple as toggling a few checkboxes.

Creating layer masks in the PlayCanvas editor

By selecting only the bones in the upper body of the character model for an anim layer, you can free up the lower body to be animated by previous layers which would have been overwritten without this upper body mask.

Anim Layer Blending

Previously when using the anim component, you could play any number of animations on top of each other by creating multiple anim layers. However, any animations from subsequent layers that animate the same bones as previous ones will completely overwrite those previous animations.

That meant that even if you were to add a shooting animation to the top half of a character, it would always be playing over a walking animation that was placed on a previous layer.

Now with anim layer blending, it is possible to smoothly blend subsequent layers in and out, changing the weight each layer contributes to the characters animation in real time.


Animation layer blending in the PlayCanvas examples browser

When editing an AnimStateGraph asset, you’re now presented with two Blend Type options in each layer. The Overwrite option is set by default and works as before, each subsequent layer completely overwrites the animation values of previous layers.

However, now, if you select the ‘Additive’ option, the anim system will take the weight of each additive layer into account and blend the layered animations accordingly. This is a great way to blend one animation on top of another.

We’re really keen to see what you can create in PlayCanvas using this feature, so be sure to check out the links below so you can begin working with layer masks and blending.

Introducing the Anim State Graph

· 4 min read
Elliott Thompson
Software Engineer

We’re excited to be able to release a new system for creating fantastic and high fidelity animations in PlayCanvas!

Animation systems receive a set of inputs (button presses, current player speed, health, etc) and output a model's animation pose for the current frame. How an animation system goes from a particular set of inputs to the desired animation pose can become quite complicated, especially when writing this in code.

Animation Input and Outputs

With the release of the Anim component, Anim State Graph assets and Anim State Graph Editor, you will be able to design and develop intricate animation behavior for your game objects right in the PlayCanvas editor.

It’s now easier than ever to make your game characters move just the way you’d like, while writing minimal code in the process!

Having recently beta tested this feature with a number of developers, we’ve already seen some fantastic results! For instance, the developer of the popular online shooter venge.io is utilizing the anim state graph to drive character animations in their up and coming online RPG.

A clip of an early build of this game can be seen below, showcasing the blending of multiple animation clips. When combined together in a state graph they create realistic and fluid movement for the main character.

This animation system was entirely developed in the PlayCanvas editor using the anim state graph user interface. The state graph for the main character can be seen below:

We can’t wait to see what other developers can create with this system!

Features

Graph Layers - Split your animation behavior into separate layers. For instance: locomotion animations can be separated from facial expressions.

Multiple characters - Because anim state graphs are stored as assets, a single graph can be used to drive the animation of as many entities as you want by assigning your graph asset to multiple entity anim components.


Multiple characters utilizing the same anim state graph

While these two characters use different animations for their various actions, they share the same behavior. With the anim state graph you can update this behavior in one place while still using it with as many characters as you like.

How does it all work?

When opening an Anim State Graph asset you’ll be presented with a visual graph editor which allows you to define all of the different animation states your game object can be in. You can then connect these states using transitions.

Create anim state graphs using the editor UI

Each transition blends between two animations over a specified amount of time. You can adjust and tweak transitions to your liking and see the results in real time in the PlayCanvas launch page. You can then assign parameter conditions to each transition to define the circumstances under which that transition can fire. These parameter values can be modified in your scripts to control the behavior of your animation system.

Control anim state graph behavior in scripts using the anim component API

Once you’ve created your Anim State Graph you can assign it to your entity using the Anim component. At this point you can attach your animation assets to each state which will play when transitioning to that state.

Looking Ahead

Today only marks the initial release of our new animation system. We’ve got grand plans on how to push the system further. Here’s a few features we’ve got in the works:

Animation Events - These events can be set up to fire and specific points during the lifetime of an animation, allowing you to hook game logic into the behavior of your anim state graph. For example you could spawn a set of dust particles during the exact frame that your character lands on the ground after a jump.

Layer Masking - You’ll be able mask your character animations on a particular state graph layer. For instance you could have only the bottom half of a character driven by a particular anim state graph layer.

Blend Trees - Directly control the blend between multiple animations in real time.


Blending three animations using a 2D cartesian blend tree

Animation Clips - Currently the anim state graph supports animation assets that have been imported into PlayCanvas. Clips will allow you to create extra animation assets within the PlayCanvas editor yourself! These will be great for quickly adding smaller animated flourishes to your game objects.

If you’re interested in using anim state graphs in your PlayCanvas projects, here’s some useful links:

Introducing JSON Script Attributes

· 2 min read
Steven Yau
Partner Relations Manager

JSON Script Attributes Preview

We have levelled up the Script Attributes that makes it much easier to organize and group related attributes together.

Using JSON, developers are able to define a schema for a data object that has multiple attributes and have them grouped together in the Inspector.

In the example below, we have created a JSON schema with the name ‘settings’ and has the attributes ‘gravity’, ‘startingHealth’ and ‘godMode’.

GameManager.attributes.add('settings', {
type: 'json',
schema: [{
name: 'gravity',
type: 'number',
default: -9.8
}, {
name: 'startingHealth',
type: 'number',
default: 20
}, {
name: 'godMode',
type: 'boolean',
default: false
}]
});

In the Inspector, the data object is shown as a collapsible section:

Collapsible script settings

Even better, these data objects can made into an array! This is a huge improvement over having to organize multiple attribute arrays that was difficult to update and error prone to maintain.

Example JSON schema for an array of enemies:

GameManager.attributes.add('enemies', {
type: 'json',
schema: [{
name: 'health',
type: 'number',
default: 10
}, {
name: 'type',
type: 'number',
enum: [
{ 'Close Combat': 1 },
{ 'Range': 2 },
{ 'Both': 3 }
]
}, {
name: 'templateAsset',
type: 'asset',
assetType: 'template'
}],
array: true
});

Becomes the following in the inspector which is so much cleaner!

Arrays of JSON objects

Read more in the documentation and let us hear your feedback in the forums!

Copy and Paste Assets between Projects

· One min read
Steven Yau
Partner Relations Manager

PlayCanvas has a pretty cool (but not widely known about) feature that allows you to copy and paste entities and entity hierarchy between two instances of the Editor. This can save a lot of time, particularly when setting up new projects.

Many of you have requested the ability to do the same with assets. Well, we listened - and now you can! 🚀

So if you need to grab some assets from another project, no more need to download from Project A and then upload to Project B. Just copy and paste in seconds, directly from project to project.

This makes it super easy to share reusable code and assets with your team and the rest of the PlayCanvas community, especially in combination with the recent launch of Templates to setup preconfigured Entities.

Use the context menu or the Ctrl/Cmd + C and Ctrl/Cmd + V hotkeys to copy assets across to your projects. 💪

Check out the documentation for more details.

Supercharge your workflow with Template Assets!

· 2 min read
Steven Yau
Partner Relations Manager

It’s finally here! The PlayCanvas team is very excited to announce the public release of our new Templates feature! 🎉

Templates allow you to create preconfigured entities with all the values and child hierarchy as an asset reference.

This is a huge workflow boost as managing and changing objects in a scene is now easier and faster to do. New instances of the Template can be placed in the scene with the Editor. These instances have a link to the Template asset, so any changes to the asset will change the instances in the scene too.

Now we are able to change and update many scene entities via a single asset which is a welcome change from the tedious manual updating of multiple entities across multiple scenes.

Change all instances of Templates in one click! 🚀

Other features of the Template system also include:

  • Adding instances in the Scene editor (including drag and drop support of template assets to the Hierarchy panel)
  • Overriding properties on a per instance basis
  • Nested Templates which allows referencing a Template in another Template
  • Creating a new instances via code from an asset reference

In terms of how they can be used, we have been beta-testing the feature since early 2020 (big thanks to all those that have given us feedback and bug reports 🙏) and some of the use cases we've seen so far include:

  • Designing and creating sections of an infinite runner game
  • Managing UI screens and instantiating them at runtime
  • Different enemy types that a script can reference to randomly generate a level

As you can see, Templates give you a wide range of flexibility of workflow options to manage and modify content in your projects.

Find out more about Templates in the User Manual and give them a try yourself!