Anim Layer Masks and Blending

· 4 min read
Elliott Thompson
Software Engineer


RUN DEMO

Today, we are releasing the latest anim component feature: the masking and blending of anim layers.

This is a versatile feature that has been hotly requested by PlayCanvas developers that wish to get even more creative with their animations. We’re excited to be able to share how it works in this blog.

Animating characters

When creating complex animation behavior for games, it is often necessary to make a character carry out multiple actions at once. For instance, you might want to create a character that can pick up and carry an item, or shoot a weapon while freely moving around a scene.

To perform these actions at the same time, the upper and lower body of the character must be animated independently. The upper body should be able to move from an idle stance to a shooting stance, and then shoot on demand, all while the lower body moves between idling, walking, running based on the player's command.

A character with two animation layers. A movement layer and a shooting layer masked to the upper body

This effect can be difficult to achieve in most 3D engines, as it usually requires removing certain animated bones in the animation files themselves, before importing those assets into a game project. Only then would a developer be able to create two animation layers, one for movement and another for shooting.

A shooting animation might have all of its lower body bones removed, which would free up the lower body to be animated by the movement layer. In large projects, this can start to become really cumbersome. Adding or removing bones from an animation would require a rebuild of the animation asset in whichever modelling software the developer is using, followed by a reimport of the asset into the PlayCanvas project.

Anim Layer Masks

Masks can streamline this workflow by enabling developers to add or remove a model’s bones from an animation layer directly. This means you can select which part of a character a particular set of animations should animate directly in the PlayCanvas editor. Testing out different combinations of character bones now becomes as simple as toggling a few checkboxes.

Creating layer masks in the PlayCanvas editor

By selecting only the bones in the upper body of the character model for an anim layer, you can free up the lower body to be animated by previous layers which would have been overwritten without this upper body mask.

Anim Layer Blending

Previously when using the anim component, you could play any number of animations on top of each other by creating multiple anim layers. However, any animations from subsequent layers that animate the same bones as previous ones will completely overwrite those previous animations.

That meant that even if you were to add a shooting animation to the top half of a character, it would always be playing over a walking animation that was placed on a previous layer.

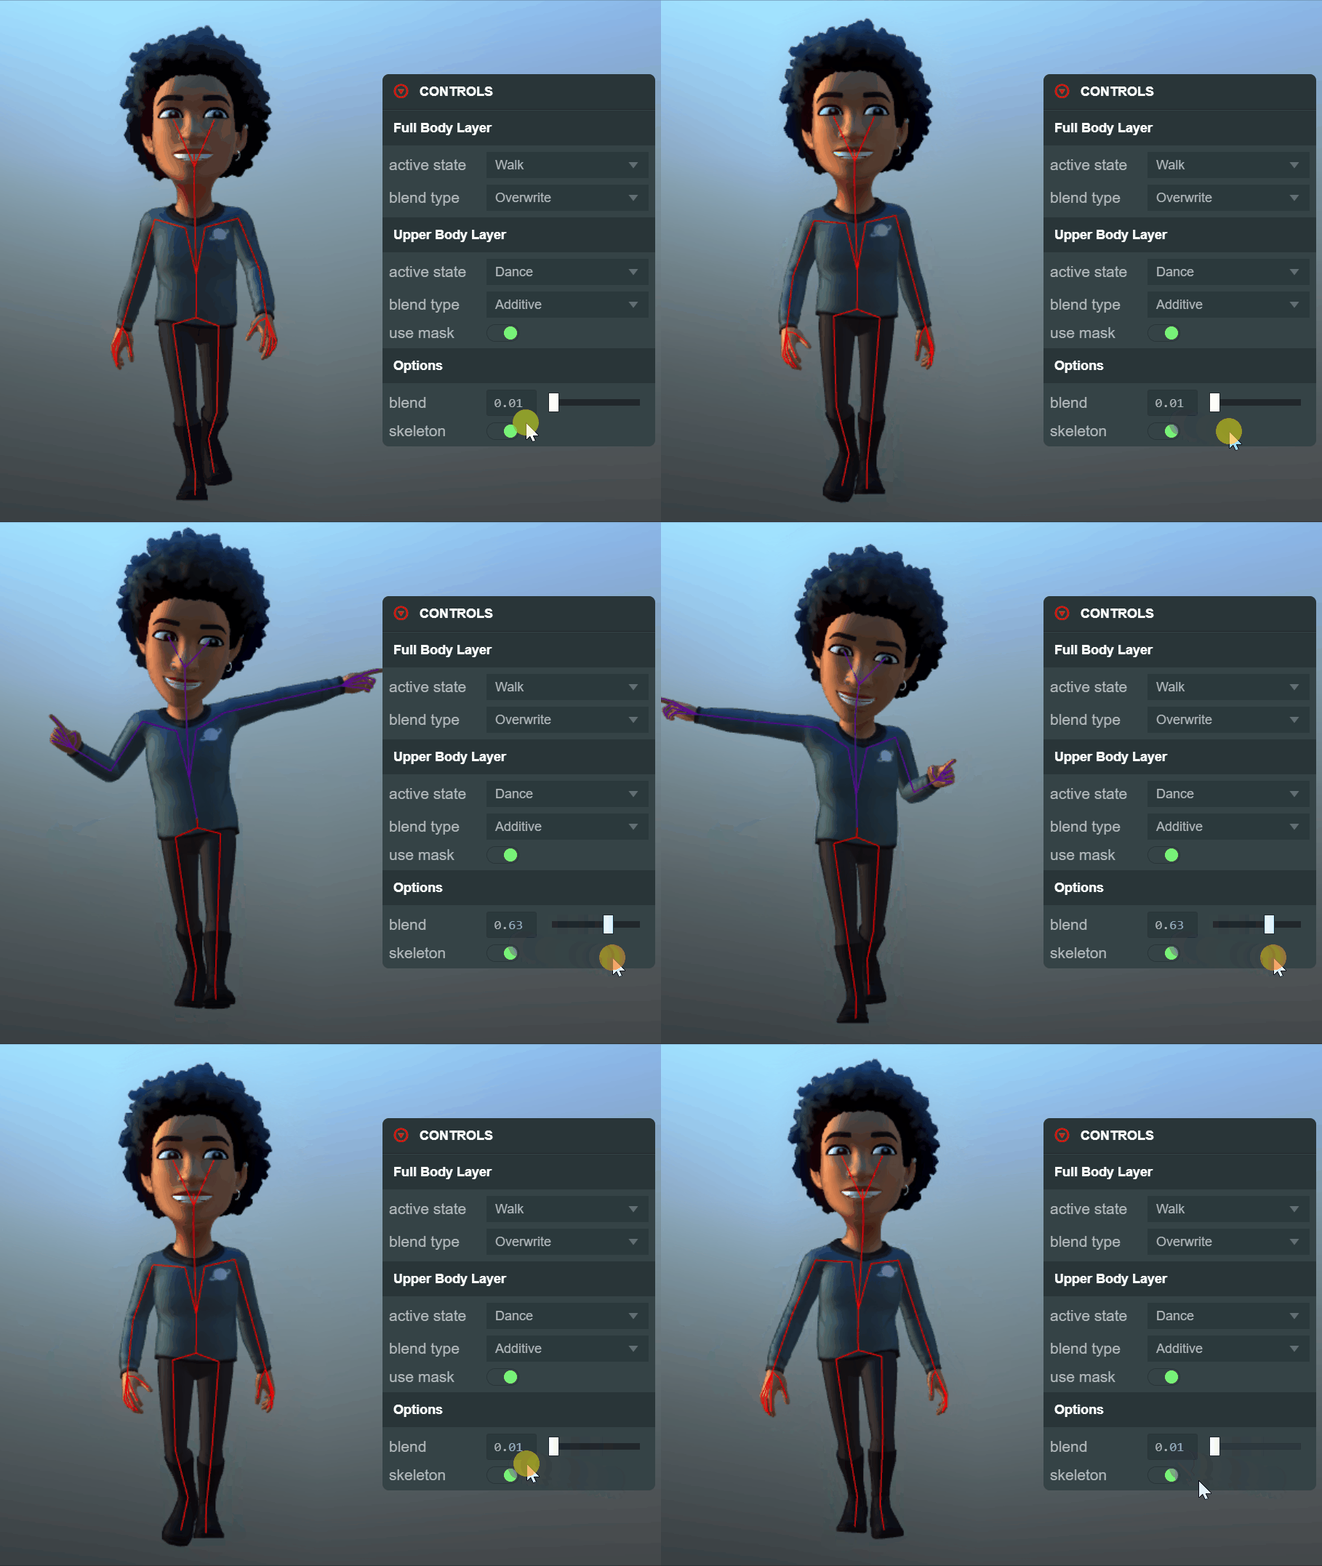
Now with anim layer blending, it is possible to smoothly blend subsequent layers in and out, changing the weight each layer contributes to the characters animation in real time.


Animation layer blending in the PlayCanvas examples browser

When editing an AnimStateGraph asset, you’re now presented with two Blend Type options in each layer. The Overwrite option is set by default and works as before, each subsequent layer completely overwrites the animation values of previous layers.

However, now, if you select the ‘Additive’ option, the anim system will take the weight of each additive layer into account and blend the layered animations accordingly. This is a great way to blend one animation on top of another.

We’re really keen to see what you can create in PlayCanvas using this feature, so be sure to check out the links below so you can begin working with layer masks and blending.

Changes to our Editor and Engine Releases

· 3 min read
Steven Yau
Partner Relations Manager

Up to now, our process for releasing new features and fixes to the PlayCanvas Engine and Editor has been rather simple.

As features and fixes are ready, we would plan a release and test against a comprehensive list of PlayCanvas projects and the Engine examples. Once testing is passed, it would be released to everyone that is using the playcanvas.com service and Editor.

This has served us well for many years and meant that users always had the latest features of the Engine.

However, as the features of the Engine are get bigger and more complex and users' projects grow in scale and size, this release process needs to change to match our users' needs for stability and transparency with releases.

Over the next month or so, we will be rolling out the following changes (finer details subject to change):

Minor and patch versions updates

Minor releases (1.XX.0 where the XX is the minor version) are currently reserved for API additions/changes in the Engine and/or larger feature releases while patch releases (1.XX.YY where YY is the patch version) could be bug fixes and minor features.

Going forward, patch releases will strictly only be for bug fixes which will generally improve stability and user expectations.

New functionality will only be added in minor releases.

Renaming Engine's GitHub 'master' branch to 'dev'

To better reflect our usage of the 'master' branch, we will be renaming it to 'dev' over the next few days as that is where our features and updates are merged prior being released.

As the branch is typically unstable, the naming of 'dev' is more descriptive of the branch's purpose.

This will have knock on effects to forks of the Engine repo on GitHub. If you have a fork of the Engine, please read the following documentation from GitHub to see how this affects you.

The steps from the documentation will be:

git branch -m master dev
git fetch origin
git branch -u origin/dev dev
git remote set-head origin -a

Alternatively, creating a fresh clone from GitHub will work as well.

Separate Engine releases from the Editor

The Editor will no longer be affected by the latest release of the Engine on the GitHub repo. The Engine version used in the Editor will only be updated via an Editor release.

While it means that Editor users will have to wait a little longer to get the latest features, it allows extra time for users to test their projects against the upcoming Engine release and report any issues.

However, users will still be able test early against the latest Engine releases using the use_local_engine param on the Launch Tab. We will also be looking at making this process easier to do via the Editor, such as an option in the Launch Tab settings.

Once this has been tested against the Editor and any reported issues are fixed, the Editor will be released with this version of the Engine.

Feedback

This is currently the high level plan and we would love to hear your thoughts and suggestions on the forums!

Import Full Model Hierarchy into PlayCanvas

· 3 min read
Steven Yau
Partner Relations Manager

The PlayCanvas team are very excited to fully release the Import Hierarchy pipeline feature in the PlayCanvas Editor!

Edit Hierarchy

With this feature enabled, any imported FBX will create a Template asset which contains the full node hierarchy as entities representing sub-models of the model. This gives users greater flexibility in manipulating mesh instances in the model directly in the Editor.

Render assets will also be created that can be used with the Render Component and allow users to add an individual mesh instance of a model in the scene.

For example, an imported car FBX model would create several Render assets, doors, wheels, wipers etc. The wheel assets can be used independently from the rest of the car model to create a tire wall.

With the model hierarchy being editable in the Editor, this opens a number of uses that weren't possible before:

  • Attach other Entities and/or models as part of another model's hierarchy such as adding a helmet to a character's head.
  • Move/Rotate/Scale sub-models directly in the Editor such as moving/adding/removing chairs around a house model.
  • Use the Render assets elsewhere in the scene for decoration or customization.
  • Add components and/or scripts to individual nodes such as attaching particle effects to animated parts.

Place Item in Hand Place an item in the hand of a character

Copy Parts of Hierarchy Copy a sub-part of a imported asset

However, please note that while the Model Component is compatible with both the Animation and Anim (State Graph) Component, the Render Component/Import Hierarchy feature is only compatible with the Anim (State Graph) Component.

Going forward, we will be marking the Model and Animation Components as 'legacy' but if you have an existing project using these components, please do not worry. None of the existing functionality is being removed and you will not be forced to update projects to the new pipeline for continued development. Although no new features will be added to the Model Component, the PlayCanvas team will continue to fix bugs with the existing pipeline until our next major version (2.0.0) of the engine at the earliest.

You can even mix both pipelines in the same project if you wish to take advantage of the features in the new pipeline in an existing project. However, please bear in mind that this can add complexity to the project code.

The Import Hierarchy asset task will be enabled by default for newly created projects. If you would like to use this feature in your existing project, please consult User Manual for details.

Important Information about macOS Safari 15

· One min read
Steven Yau
Partner Relations Manager

We have been made aware of a critical issue regarding WebGL content and the release of macOS Safari 15 earlier this week where previously published content could fail to load.

Apple are aware of this and have a fix in place on WebKit. However, we don't know when this fix will be included in an update release.

PlayCanvas have released v1.46.5 of the engine to workaround this issue.

Actions to take

If you have a PlayCanvas application that was published between Feb 2020 and 21st Sep 2021, the application will fail to load on Safari 15 until Apple releases an update and users update their devices.

Please republish the application so that it uses the latest engine release or update the engine version to v1.46.5 if you are using NPM.

If you need to stay on particular version of the PlayCanvas engine, it is possible modify the engine or build a custom version and include the following code change from this PR.

If you have any issues or questions, please message us on the forum where we will provide support.

PlayCanvas Showcase 2021

· One min read
Steven Yau
Partner Relations Manager

We are very excited to release our very first showcase reel, showing some of the very best WebGL browser games and experiences made with PlayCanvas to date!

Many thanks for to all our partners and users that allowed us to show their awesome content in the video:

See more games and experiences at Awesome PlayCanvas!

A Graph Rendering Library for the Web: PCUI Graph

· 2 min read
Elliott Thompson
Software Engineer

Today, we are excited to announce a new open source library: PCUI Graph. It’s a graph rendering framework for the browser which can be used to build and view various types of node-based graphs.

A Simple Graph
PCUI Graph in action

Last year, we open sourced PCUI, a front-end framework for building web-based tools like the PlayCanvas Editor. This was subsequently used as the foundation for a new family of open source tools: the glTF Viewer and the PlayCanvas Examples Browser. However, some of our more recent tools projects have had requirements related to the creation and editing of node-based graphs. As a result, we set about developing a new plugin to PCUI called PCUI Graph. This plugin is already in use today since it powers both the PlayCanvas Shader Editor and Animation State Graph Editor:

Graph Editors

You can rapidly map out key parts of your project’s workflow using pcui-graph, as it supports both directed and visual programming graphs. Here are some of the key features that PCUI Graph provides:

  • Schema based - Each graph you create is based on a JSON formatted schema, allowing you to easily define the type of your graph up-front.
  • Event system - You can hook up event listeners to any of the UI interactions made to a graph.
  • Graph state data - Easily retrieve the current state of the graph in JSON data format at any time and this can be loaded back into the graph later.
  • Context menus - You can define context menus in a graph schema, supporting the creation and deletion of nodes / edges in the UI.

Add Transition

  • Simple API - Any of the user interactions with the graph can also be made programmatically.
  • Styling - The graph can be configured to change the default styling of nodes / edges. These styles can also be overridden in the schema of each individual node / edge type.

PCUI Graph Styling

So get started with PCUI and PCUI Graph today. We can’t wait to see what you build!

Learn the PlayCanvas API with the Engine Examples Browser

· 2 min read

PlayCanvas has a rich JavaScript API that allows you to build just about any type of interactive content imaginable - games, playable ads, product configurators, AR, VR and more! But learning a new API can be tough. Reading API reference documentation is all well and good, but many people prefer to learn by experimentation. And by examining the code of real world examples. This led the PlayCanvas team to build a new application: the Engine Examples Browser.

Starting exploring the Examples Browser now:

https://playcanvas.github.io/

The browser is written entirely in TypeScript and uses a Webpack build process. Naturally, it is 100% open source (MIT license) and the source can be found here.

The Examples Browser has some pretty cool features:

  • Gallery panel. Select any of the 86 examples from the (filterable) list on the left, either by name or thumbnail.
  • Inspect Source. Expand the source panel (built on the awesome Monaco code editor) on the right to inspect any example's source code.
  • Edit and hot reload. Edit any example and hit the Play button to refresh the running example. Monaco uses PlayCanvas' TypeScript definitions to provide inline API hints.
  • Embed links. Want to embed PlayCanvas examples in your own site? Simply hit the embed icon and copy the URL!
  • Share to Twitter. Want to share a specific example with the world? Just hit the Twitter icon!

If you would like to request an example to be added to the browser, submit an issue here. Or if you're feeling creative, submit a pull request of your own to the repo! Stay tuned for newly added examples in the coming months. Enjoy!

Transitioning to the New Render Component and Fill Mode API

· 5 min read
Steven Yau
Partner Relations Manager

Hi everyone!

This is a different blog post to what we normally do but with some big changes coming soon, we wanted to give context and advance notice of said changes and more importantly, how they may affect you across the PlayCanvas platform.

Moving from Model Component model import pipeline to new Render Component

As part of the work to enable the import of a model’s hierarchy into the scene, we have introduced Render Asset and Render Component as new features of the Engine and Editor.

Import Hierarchy Preview

Going forward, this will be the default way to render imported models and gives developers greater flexibility in manipulating mesh instances in the model directly in the Editor. For example, with the new pipeline you can import a house FBX model and only use the door mesh instance in the scene instead of the whole model.

However, please note that while the Model Component is compatible with both the Animation and Anim (State Graph) Component, the Render Component/Import Hierarchy feature is only compatible with the Anim (State Graph) Component.

(More details will be shared in an upcoming announcement, stay tuned for that!)

For existing projects using the Model Component, please do not worry. None of the existing functionality is being removed and you will not be forced to update projects to the new pipeline for continued development. Although no new features will be added to the Model Component, the PlayCanvas team will continue to fix bugs with the existing pipeline.

You can even mix both pipelines in the same project if you wish to take advantage of the features in the new pipeline in an existing project. However, please bear in mind that this can add complexity to the project code.

The expected changes over the upcoming months are as follows:

  • Add/Rename a Project Setting to switch between the two mesh import pipelines (Currently, this is the ‘Import Hierarchy’ setting).
  • Newly created projects will default to using the Render Component pipeline.
  • developer.playcanvas.com tutorials will be updated to use Render Component (playcanvas.github.io engine examples have already been updated).
  • The template projects (Blank Project, Model Viewer Starter Kit, VR Starter Kit) will be updated to use Render Component.
  • User Manual updates and mitigation steps from using the Model Component to Render Component pipelines.

Breaking change to PlayCanvas Fill Mode API

We want to make the PlayCanvas engine as flexible as it can be for the widest range of use cases for web developers. To do so, we occasionally have to break existing APIs that may have made sense when they were first introduced, but not today.

One such API is the Fill Mode related functions on pc.Application:

These functions affect the canvas element size in the DOM as it was long assumed that apps made with PlayCanvas are either be iframed or fullscreen/full document apps.

However, there has been more requests about having more control of the canvas element rather than using iframes. The main reason is that it’s easier to communicate between the page and the PlayCanvas app without having to deal with iframe messaging.

Some examples:

Currently, there is no way for an end user to have full control of the canvas without patching the engine.

Also, from an architecture point of view, the Engine shouldn’t handle the size or position of the element that it is rendering in. The responsibility should be on the web document and how it wants to layout the elements on the page (e.g through stylesheets).

These changes will affect you directly if you are:

  • An engine only user as the HTML boilerplate will handle the resizing and positioning of the canvas. We will provide examples in the examples folder.
  • Any developer that changes the fill mode or resizes the Canvas at runtime. Some developers do this to handle landscape and portrait mode more effectively.

The current plan is deprecate these functions and move them to globally accessible functions on the page on the PlayCanvas Editor environment with as little (if any) downtime for projects or developers. At worst, you should only get a few warnings in the console log regarding deprecated function use.

The steps will be as a gradual rollout:

  • Add globally accessible JS functions in the Editor and publish HTML templates to replace the fill mode functions from the Engine.
  • Change the PlayCanvas Editor and published build templates to patch the Engine functions to call the global functions above with warnings that they should use the global functions instead.
  • Update the User Manual to document these global functions.
  • Deprecate the affected engine functions with warnings and reference the User Manual page.

Questions and Feedback

If there are any questions or areas that you would like to be made more clear, please post in the forums and the PlayCanvas team will be there to answer.

The PlayCanvas team are appreciative of your patience and continued support as we go through this transition!

Introducing the Anim State Graph

· 4 min read
Elliott Thompson
Software Engineer

We’re excited to be able to release a new system for creating fantastic and high fidelity animations in PlayCanvas!

Animation systems receive a set of inputs (button presses, current player speed, health, etc) and output a model's animation pose for the current frame. How an animation system goes from a particular set of inputs to the desired animation pose can become quite complicated, especially when writing this in code.

Animation Input and Outputs

With the release of the Anim component, Anim State Graph assets and Anim State Graph Editor, you will be able to design and develop intricate animation behavior for your game objects right in the PlayCanvas editor.

It’s now easier than ever to make your game characters move just the way you’d like, while writing minimal code in the process!

Having recently beta tested this feature with a number of developers, we’ve already seen some fantastic results! For instance, the developer of the popular online shooter venge.io is utilizing the anim state graph to drive character animations in their up and coming online RPG.

A clip of an early build of this game can be seen below, showcasing the blending of multiple animation clips. When combined together in a state graph they create realistic and fluid movement for the main character.

This animation system was entirely developed in the PlayCanvas editor using the anim state graph user interface. The state graph for the main character can be seen below:

We can’t wait to see what other developers can create with this system!

Features

Graph Layers - Split your animation behavior into separate layers. For instance: locomotion animations can be separated from facial expressions.

Multiple characters - Because anim state graphs are stored as assets, a single graph can be used to drive the animation of as many entities as you want by assigning your graph asset to multiple entity anim components.


Multiple characters utilizing the same anim state graph

While these two characters use different animations for their various actions, they share the same behavior. With the anim state graph you can update this behavior in one place while still using it with as many characters as you like.

How does it all work?

When opening an Anim State Graph asset you’ll be presented with a visual graph editor which allows you to define all of the different animation states your game object can be in. You can then connect these states using transitions.

Create anim state graphs using the editor UI

Each transition blends between two animations over a specified amount of time. You can adjust and tweak transitions to your liking and see the results in real time in the PlayCanvas launch page. You can then assign parameter conditions to each transition to define the circumstances under which that transition can fire. These parameter values can be modified in your scripts to control the behavior of your animation system.

Control anim state graph behavior in scripts using the anim component API

Once you’ve created your Anim State Graph you can assign it to your entity using the Anim component. At this point you can attach your animation assets to each state which will play when transitioning to that state.

Looking Ahead

Today only marks the initial release of our new animation system. We’ve got grand plans on how to push the system further. Here’s a few features we’ve got in the works:

Animation Events - These events can be set up to fire and specific points during the lifetime of an animation, allowing you to hook game logic into the behavior of your anim state graph. For example you could spawn a set of dust particles during the exact frame that your character lands on the ground after a jump.

Layer Masking - You’ll be able mask your character animations on a particular state graph layer. For instance you could have only the bottom half of a character driven by a particular anim state graph layer.

Blend Trees - Directly control the blend between multiple animations in real time.


Blending three animations using a 2D cartesian blend tree

Animation Clips - Currently the anim state graph supports animation assets that have been imported into PlayCanvas. Clips will allow you to create extra animation assets within the PlayCanvas editor yourself! These will be great for quickly adding smaller animated flourishes to your game objects.

If you’re interested in using anim state graphs in your PlayCanvas projects, here’s some useful links:

Build Facebook Playable Ads with PlayCanvas!

· 2 min read
Steven Yau
Partner Relations Manager

Facebook Playable Ad

PlayCanvas are very excited to announce official support for Facebook Playable Ads! 🚀

What are Playable Ads?

Playable ads are small, interactive previews of a game or app that give a taste of the experience before the user choses to download it. These ads from Facebook are normally shown in the news feed or with ‘rewarded ads’ in other games and apps in exchange for an in-game/app reward.

Facebook case studies consistently show that playable ads:

  • Increase click-through rates
  • Increase install conversion over traditional ads
  • Increase return on ad spend
  • Reduce cost per install
Bitmoji CreatorCube JumpFlappy Bird

Combine that with the fully featured PlayCanvas game engine which includes:

  • Best in class visual editor with live updates across multiple devices
  • 3D models and animation with physically based rendering (PBR)
  • 2D animated sprites
  • Responsive user interface authoring

And you have a very powerful combination to create fantastic and engaging experiences to reach your audience.

BMW in EditorRobostorm in Editor

Sounds great! How do I get started?

We’ve published the official exporter tool on GitHub with instructions in our User Manual Documentation. It’s very simple to set up!

Once configured, creating the file(s) for upload to Facebook is just a single command, shown in real time below.

Playable Ad Workflow

That is how quick and easy it is! 💪 And it supports both the single 2MB HTML and 5MB zip bundle formats used by Facebook. 🙌

Facebook Ad Formats

If you’re new to PlayCanvas, why not sign up today for free. We can’t wait to see what you make! Let us hear your feedback in the forums!

P.S. We are considering doing a follow up technical post on how the tool works under the hood. Let us know on the forum if that is something you would be interested in.